Nemisindo is a procedural audio synthesis framework specialising in sound effects. We provide a
vast selection of models suitable for all your sound design needs.
All the sounds found on Nemisindo are built with real-time sound synthesis models. Our models are tuned to synthesise a specific class of sound,
while exposing certain parameters that control the sound qualities. We provide intuitive controls to help fine-tune sound effects quickly and precisely.
Models can be regarded as self-contained sound source applications. This provides the flexibility to interact with them in different ways.
Though synthesis models are tailored to generate a diverse range of sounds without the use of samples,
the availability of control parameters allows the production of large banks of presets.
Another benefit over pre-recorded audio files is the ability to manipulate the audio directly at the source.
As such, characteristics such as pitch and duration can be changed without any post-processing, like pitch-shifting or time-stretching.
Here is a short demonstration of creating sound effects for an action scene using our system:
By running mutliple models in parallel, a sound scene (or "soundscape") is created.
Some scenes are offered within the framework as a conjunction of parallel synthesis models forming the sound effect chain.
These combinations of sounds form more complex textures and illustrate what can be achieved with the platform. Each scene model provides parameters
to control the individual components of the scene in addition to overall control and processing of the soundscape. Example soundscapes models incorporated
into Nemisindo include a Stormy Day scene with rain, wind, stream and thunder,
and a Night campsite scene with fire, wind, crickets and insects.
Procedural audio synthesis is useful for many applications, for example video games. The following demo shows actual game footage, but with all sound effects replaced with procedurally generated
sounds from nemisindo.com (original video: CGI Cinematic HD "Unreal Engine 4 Showdown Cinematic VR Demo" by Epic Games)
Recording and downloading sounds from your favourite model or your favourite preset in nemisindo is easy!
You can watch this step by step instructional video or continue reading:
Step1: Click the profile button on the top right corner of the webpage
Step2: If you have an account already click login, or else click on the register button to register a new account
Step3: Enter all the required information in the registration form and agree to our Terms and conditions and the GDPR statement.
Step4: Click Submit.
Step5: We send a verification email to the your registered email, head over to your email account and check in your inbox/spam folders for an email from nemisindo.
Step6: In the email, click on the verification link.
Step7: This verification link will now redirect you back to the login page.
Step8: Now youre account is verified and you can enter your verified email and password in the login section to access your account.
Step9: Select the models tab and click on your favourite model or from the presets tab click on your favourite preset.
Step10:Trigger the sound and click on the record button to start recording audio.
Step11: At the moment we allow for recording 60 seconds of audio at once.
Step12: Once you've recorded your sounds, stop your recording and click on the checkout button.
Step13: This will take you to your receipt, you can click on the recording name on the receipt to head to your recordings tab, or choose the recordings tab from the Dashboard.
Step14: In the recordings page click on your recording name to download it.
Step15: Now the recording is downloaded to your local storage device.
Step16: You can save a receipt for your purchase by visiting the receipts tab and clicking on the receipt name.
There are multiple ways to access our models. The easiest way is to head to our Models Section. You will find all
of our synthesis Models, listed in alphabetical order. Our range of models include impacts, textures, animal noises, sci-fi noises, soundscapes, and much more.
Simply click on the one you are interested in, and start customising your sound. From the model page, you can load a preset to use as a starting point.
You can browse all our presets in the Presets Page. For each preset, you can either download
a short snippet or visit the model’s page with the preset loaded and ready to manipulate.
We have hundreds of presets available, but you can use the search bar if you know what you are looking for.
You can also search for presets directly in the home page.
Once a model is loaded, you must toggle the "Start Audio" switch on the top left to start the sound engine. Some models will continously produce sound, but others
will need you to trigger the sound manually (e.g. the Birds model). Each model has a certain number of parameters, which either describe a physical characteristic
(e.g. density of rain, crackling of fire), or a semantic descriptor commonly used for sound design (e.g. warmth, depth). You can control the synthesis engine
without having to worry about the specifics of the algorithm generating the sound. Most of our models let you do so with sliders, knobs, and buttons, although
some of our more elaborate models have further complex interfaces. (e.g. Rolling Model).
We will soon provide tutorials for every single model. In the meantime, we invite you to play around with the controls until you find something you like.
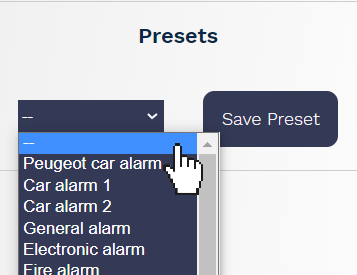
A preset is a selection of pre-determined parameters for a particular model.
On the left-hand side of a model page, you will find the preset selection interface. To load a preset, click on the drop-down menu and select a preset from the list.
It will load automatically. Toggle the "Start Audio" switch to hear the preset.
If you have come up with a set of parameters that you would like to save, you can click "Save Preset" to update the URL. The page's URL will now reflect all the changes
you made to the model parameters. Save this URL to come back to your custom sound whenever you want.
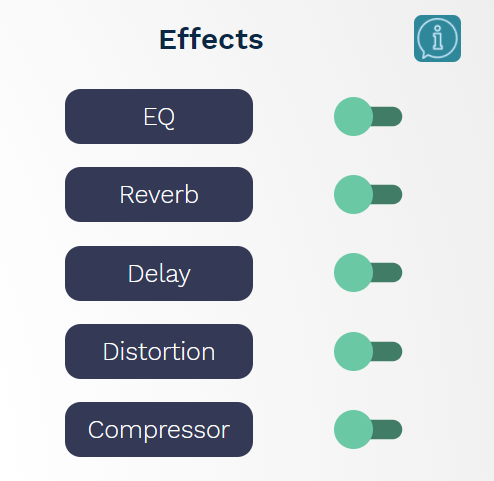
A chain of post-processing effects is available for further sculpting and manipulation of the sound. This chain is built-in to every model we provide and includes
Distortion, Delay, Reverb, Parameteric EQ, and Compression. Each effect can be toggled on and off, and adjusted to your liking.
To open the control interface for an effect, simply click on it (blue button). The toggle next to each effect controls wether or not the effect is bypassed.
By default, all the effects are bypassed.
• Parametric EQ:
The equaliser provides 5 bands to manipulate the frequencies of the sound. Each band has controls for the frequency, gain, and Q-factor.
• Reverb:
The Reverb effect is a convolutional reverb. It offers a selection of impulses responses, and controls for high-cut, low-cut, and wet/dry parameters.
• Feedback Delay:
The Delay effect is a standard feedback delay with basic controls for delay time, cutoff, feedback amount, etc.
• Distortion:
The Distortion effect allows precise shaping of its clipping curve. The drive, tone, and knee can all be adjusted.
• Compression:
The last effect in the chain is a dynamic range compressor, with standard parameters like treshold, knee, ratio, attack, etc.
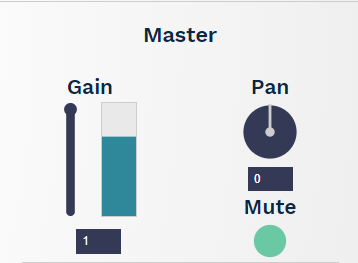
Finally, there are also controls available for the master gain and panning.
On all model pages, you will find a small audio visualiser. It can be toggled between two modes: Spectrum Analyser and Oscillator.
When sound is played, the visualiser will automatically start displaying the sound. You can click on it to pause it.
You can randomise the parameters of a model via the randomisation interface. To access it, click the "Random" button in the Tools panel. Select which parameters
you would like to randomise, set the range using the slider, and click randomise. The parameters you selected will have changed. You can test the new settings and
keep adding randomness until you find something interesting.
The Spatialisation feature is a powerful sound design tool to further sculpt sound scenes. It lets you place the sound source somewhere around the listener in a
3D Cartesian coordinate system, thus changing the perceived location of sound sources. By continously changing the parameters of the effect, you can create the illusion of movement.
The interface features a 2D plane to place the sound horizontally (left/right) and vertically (above/below) around the listener. An additional slider controls the third dimension (front/back). How to use 3D Spatialisation:
Height and Width can be used to adjust the room dimensions.
The 2D plane can be used to place the sound source on the Left or Right (X axis) and Above or Below (Y axis) the listener.
The last slider is used to place the sound source in front or at the back of the listener.
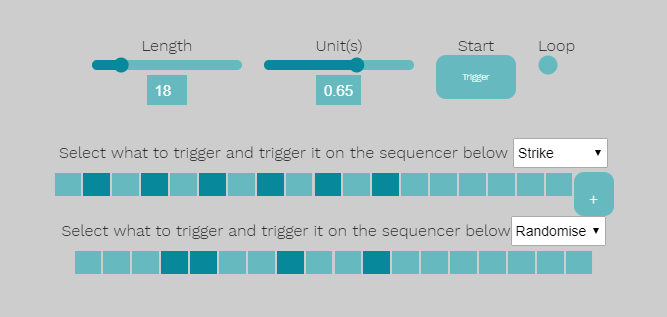
The Trigger feature lets you trigger the model sound at specific times. This feature is only supported by models with a trigger parameter. Individual timeline
tracks can be generated and used to trigger each of the parameters of the model. The current version of this feature provides discrete sequencer tracks with
adjustable step size and sequence length, and an option for looping.
Each trigger-based parameter can be triggered at desired times by marking those points on the timeline. Parameters which can be used include model trigger
parameters (e.g. fire, explode, hit, etc), any of the presets and the Randomiser. The Randomiser can be triggered at specific intervals to apply a small
percentage of randomisation to the model parameters and create a natural variation in the synthesis over time.
How to use the Trigger Functionality:
Make sure that the "Start Audio" switch is toggled on.
In the Tools panel, click on "Trigger".
Select what to trigger from the list
Choose sequence size and time unit using the respective sliders
Click on the sequencer to select the times when the sound should trigger
Press the + button to add a new sequencer for the next sound source.
Finally, press trigger to activate the sequencer.
We created two programs for the specific purpose of recreating and manipulating pre-recorded sound effects. They are the
Sinusoidal Model and the
Granular Synth, respectively.
Sinusoidal Model:
The goal of the sinusoidal model is to analyse a recording and re-synthesise it. The result will approximate the timbre of the
original sample, and allow you to change the pitch or duration of the new sound.
Granular Synth:
Granular synthesis is a well-known and very trendy sound synthesis method. While it's more often used in music production to create glitchy textures,
we think it could have some applications for sound effects. That's why we offer a full-fledged, browser-based granular synthesiser as part of our system.