Every plugin is provided with a setFloatValue(int channel, int index, float value) function and a getFlowValue(int channel, int index) function to enable easy communication between the plugin via scripting.
setFloatValue(int channel, int index, float value)
Channel : is the current plugin instance that can be explicitly mentioned by the user. Each plugin can have a different or the same instance and the parameters in that particular instance can be accessed by mentioning the plugin instance value here.
There are a total of 32 channels specified which means that there can be 32 different instances of any plugin running at once in your project.
Index: is index of the plugin parameter, this is marked in the plugin interface right in front of the parameters name.This is used to access that specific parameter in the chosen plugin instance.
Value: is used to set the value of the chosen audio parameter.
Example:
To set the carrier frequency of the 0th instance of an alarm plugin to 1500Hz.
setFloatValue(0,1,1500)
can be used
Similarly to get the carrier frequency of the same alarm plugin
getFloatValue(0,1)
can be used
In addition to the setFloatValue function you can also additionally address each of these parameters specifically using the plugin dedicated functions listed below:
Alarm
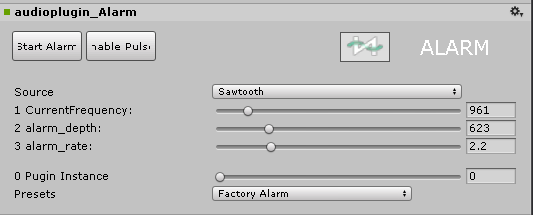
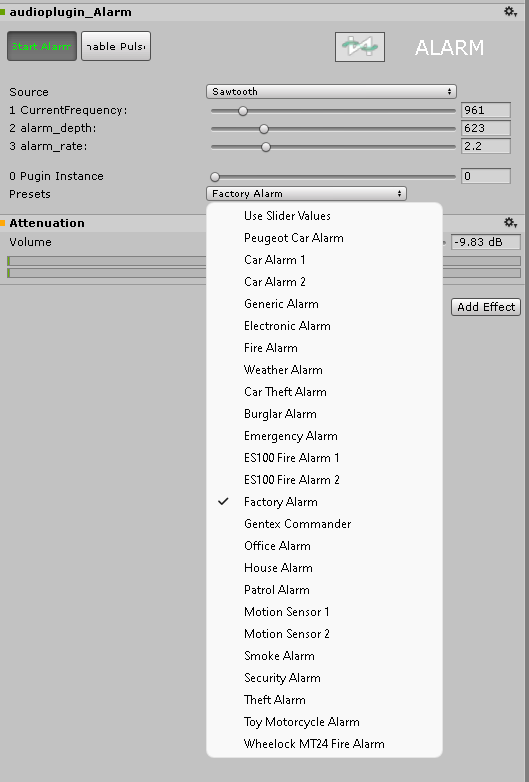
The Alarm model has 5 parameters:
- Shape: Which type of waveform will drive the alarm sound
setSource(float channel, float value);
Carrier Frequency: Base pitch of the alarm
setPitch(float channel, float value); //Controls the Carrier Frequency
Rate: How fast the pitch varies
setRate(float channel, float value); //Controls the rate
Depth: How much the pitch varies
setDepth(float channel, float value); //Controls Depth
Pulse: Whether or not the alarm should pulsate
                    PulseOn(float channel); //Toggles the Pulse Switch on

                    PulseOff(float channel); //Toggles the Pulse Switch off
Start Alarm: To start the alarm
StartAlarm(float channel); //Start the alarm
Stop Alarm: To stop the alarm
StopAlarm(float channel); //Stop the alarm
Alert
The Alert model has 2 parameters:
- Pitch: Pitch of the alert
setAlertPitch(float channel, float value); //Controls the pitch of the alert
Duration: Duration of the alert
setAlertDuration(float channel, float value); //controls the duration of the alert
Trigger: Trigger the Alarm
TriggerAlert(float channel, float value); //Triggers the alert
Explosion
The Explosion model has 10 parameters:
- Rumble: Loudness of the rumbling
setRumble(float channel, float value); //Controls the Low End Gain of Explosion
Rumble Decay: Decay time of the rumbling
setRumbleDecay(float channel, float value); //Controls the Low Decay parameter
Air: Loudness of the wind gust
setAir(float channel, float value); // Controls the Pink Gain of the Explosion
Air Decay: Decay time of the wind gust
setAirDecay(float channel, float value); //Controls the pink Decay Parameter
Dust: Loudness of the dust displacement
setDust(float channel, float value); //Controls the White Gain of Explosion
Dust Decay: Decay time of the dust displacement
setDustDecay(float channel, float value); //Controls the White Decay Parameter
Time separation: Time separation between the components of the explosion
setHighDelay(float channel, float value); //Sets the time separation between the low and high parts
Grit: Whether or not to apply distortion
                  GritOn(float channel); //Turn Grit On

                  GritOff(float channel); // Turn Grit off
Grit Amount: Amount of distortion to apply if Grit is enabled
setGritLevel(float channel, float value); //Controls the Grit level in each
Over the Top: Whether or not to apply an extra layer of distortion
                  OttOn(float channel); // Turn OTT on

                  OttOff(float channel); //Turn OTT off
Trigger: Trigger Explosion
Explode(float channel); //Trigger Explosion
Fire
The Fire model has 5 parameters:
- Lapping: Loudness of the fire lapping
setLap(float channel, float value); // Change the lapping Gain
Hissing: Loudness of the fire hissing
setHiss(float channel, float value); // Change the Hissing Gain
Crackling: Loudness of the fire crackling
setCrackle(float channel, float value); //Change the crackling gain
Intensity : Strength of the fire
setIntensity(float channel, float value); //Set the intensity of the plugin
Volume: Set the overall volume of fire
setVolume(float channel, float value); // Change the overall loudness of fire
Footsteps
The Footsteps model has 21 parameters:
setPace (float channel, float value);
CSet Firmness
setFirmness (float channel, float value);
Steadiness
setSteadiness (float channel, float value);
Set shoe type
setShoeType (float channel, float value);
Set the type of surface
setSurfaceType (float channel, float value);
Set the type of terrain
seTerrainType (float channel, float value);
Set Volume
setVolume (float channel, float value);
Automate Footsteps
setStart (float channel);
Stop Footsteps
setStop (float channel);
Trigger
setTrigger (float channel);
HeelGain
setHeelGain (float channel, float value);
HeelAttack
setHeelAttack (float channel, float value);
HeelDecay
setHeelDecay (float channel, float value);
HeelSustain
setHeelSustain (float channel, float value);
HeelRelease
setHeelRelease (float channel, float value);
BallGain
setBallGain (float channel, float value);
BallAttack
setBallAttack (float channel, float value);
BallDecay
setBallDecay (float channel, float value);
BallSustain
setBallSustain (float channel, float value);
BallRelease
setBallRelease (float channel, float value);
RollGain
setRollGain (float channel, float value);
Gunshot
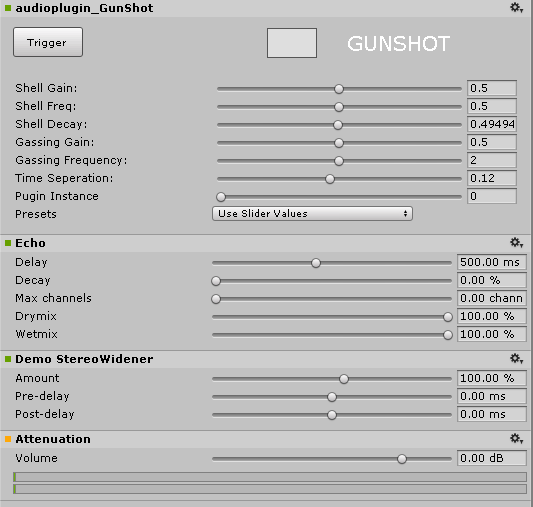
The Gunshot model has 6 parameters:
- Shell Gain: Loudness of the shell noises
setShellGain(float channel, float value); //Change the Shell Loudness
Shell Decay: Duration of the shell noises
setShellDecay(float channel, float value); //Change the Decay Loudness
Shell Freq : Pitch of the shell noises
setFrequency(float channel, float value); //Change the Pitch of the Shell Sound
Time Sep : Time separation between the two shell noises
setTimeSeperation(float channel, float value); //change the Time Delay between shell and gasing sounds
Gassing Gain: Loudness of the gassing noise
setGassingGain(float channel, float value); //Change the Gassing Gain
Gassing Freq: Pitch of the gassing noise
setGassingFreq(float channel, float value); //Change the pitch of the gassing sound
Shoot: Trigger to fire the gun
Shoot(float channel);//Trigger the gunshot
Helicopter
The Helicopter model has 12 parameters:
- Rotor Period: Time (ms) for main rotor blades to do one full rotation. Lower value -> Faster blades
setRotorSpeed(float channel, float value); //Change the Rotor Speed
Rotor Intensity: Controls the timbre of the the rotor blades sound. Higher value -> Harsher sound
setRotorIntensity(float channel, float value); //Change Rotor Intensity
Rotor Resonance: Tonality of the rotor blades. Higher value -> More ringy sound
setRotorRes(float channel, float value); //Change Rotor Resonance
Rotor symmetry: Blades' symmetry factor. Higher value -> More "Whoosh"
setRotorSymmetry(float channel, float value); //Change Rotor Symmetry
Engine Speed: Speed of the engine
setEngineSpeed(float channel, float value); //Change the Engine Speed
Engine mix: Loudness of the engine
setEngineMix(float channel, float value); //Change the Loudness of the Engine sound
Rotor mix: Loudness of the rotor
setRotorMix(float channel, float value); //Change the Loudness of the rotor sound
Gear mix: Loudness of the gears
setGearMix(float channel, float value); //Change the Loudness of the Gear Sound
Tail mix: Loudness of the secondary tail rotor
setTailMix(float channel, float value); //Change the Loudness of the Tail Sound
Blade shape: Width of the blades
setBladeShape(float channel, float value); //Change the Shape of the helicopter blade
Distance: How distant the helicopter sounds
setDistance(float channel, float value); //Change the distance at which the helicopter is flying from the observer.
Rotor Shift: This controls the pitch of the Rotor Resonance
setRotorShift(float channel, float value); //Change Rotor Shift
Jet
The Jet model has 5 parameters:
- Turbine Gain: Loudness of the turbine
setJetGain(float channel, float value); //Set the overall volume of the jet
Burn Gain: Loudness of the afterburner
setBurnGain(float channel, float value); //Change the burn volume
Maximum thrust: Maximum thrust that the jet can reach
setMaxThrust(float channel, float value); //Change the thrust volume
Acceleration Time: Time it takes for the jet to reach the maximum thrust after start
setAccelerationValue(float channel, float value); //Change the Acceleration value
Manual mode: When enabled, the Acceleration Time is ignored and thrust instantly reaches the value specified.
setManual(float channel); //Switch from Automatic to manual mode
setAutomatic(float channel); //Switch from Manual to Automatic mode
by Maximum Thrust. Use this if you want to automate the thrust yourself. Disable if you want to use the built-in automation.
Propeller
The Propeller model has 5 parameters:
- RPM: How fast the propeller is spinning (Rotations Per Minute)
setRPM (float channel, float value); //Change the Propellers RPM
Horse Power: Horse Power of the propeller
setEnginePower (float channel, float value); // Set the overall Engine power of the propeller
Number Of Blades: Number of blades on the propeller
setNumBlades (float channel, float value); //Change the number of blades in the propeller
Doppler Distance: When Doppler is enabled, this parameter affects the pitch of the sound.
Higher Value -> More pitch shift. Automate this parameter to simulate a doppler effect.
setDistance (float channel, float value); //Change the observers distance
Rifle
The Rifle model has 6 parameters:
- Low End Gain: Loudness of the low frequencies ("Rumble", "Boominess")
setLowGain (float channel, float value); //Change the Low end gain of the rifle sound
Mid Range Gain: Loudness of the mid frequencies ("Thud", "Clap")
setMidGain (float channel, float value); //Change the Mid gain of the rifle sound
High End Gain: Loudness of the high frequencies ("Brightness", "Air")
setHighGain (float channel, float value); //Change the High end gain of the rifle sound
Rifle Type: Type of rifle; AK-47, Winchester or Beretta
setRifleType (float channel, float value); //Change the type of the rifle sound
Decay: Decay time of the gunshot
setDecay (float channel, float value); //Change the overall time duration of the rifle sound
Over The Top: Whether or not to apply extra distortion
                    OttOff (float channel); //Set the OTT processor On

                    OttOn (float channel); //Set the OTT processor Off
Shoot: Trigger to fire the gun
shootRifle (float channel); //Trigger the rifle.
Rocket
The Rocket model has 3 parameters:
- Duration: Duration of the rocket launch in seconds
setDuration (float channel, float value); //Set the duration of exit
Exit Noise: Loudness of the ignition
setExitNoise (float channel, float value); //Set the loudness of the initial exit noise
Chamber Resonance: Ringiness of the ignition
setChamberRes (float channel, float value); //Set the loudness of chamber resonance
Launch: Click to launch the rocket
LaunchRocket (float channel); //Launch the rocket
Siren
The Siren model has 2 different modes, Whelen-style and Two-tone.
Siren Type: Select the siren type:
setType (float channel, float value); //Select between a multi-tone siren and the whelen style siren
Whelen-Style Parameters:
- Speed: Rate of the frequency sweeping
setSpeed (float channel, float value); //Set the speed of the multi siren
Frequency: Base pitch of the siren
setPitch (float channel, float value); //Set the overall pitch of the multi siren
Texture: Changes the timbre of the Siren. Higher Value -> Harsher sound
setTexture (float channel, float value); //Set the texture of the multi siren
Low Tone: Loudness of the low-pitched layer
setLowTone (float channel, float value); //Set the low tone loudness of the multi-tone siren
Two-Tone Parameters:
- Pitch 1 : Pitch of the first tone
setPitch1 (float channel, float value); //Set the pitch of the first oscillator in the multi-tone siren
Pitch 2 : Pitch of the second tone
setPitch2 (float channel, float value); //Set the pitch of the second oscillator in the multi-tone siren
Oscillator Type: Which type of waveform will drive the alarm sound
setOscType (float channel, float value); //Select the source oscillator for the whelen-style siren
Rate : Time (in ms) the siren takes to alternate between pitch 1 and pitch 2
setRate (float channel, float value); //Set the rate of the whelen-style siren
Tremolo : Whether or not to add a tremolo effect
                      setTermeloOn (float channel);             //Set Termelo On

                      setTermeloOff   (float channel);          //Set Termelo Off