Sounds
Products
Help
About
Blog
Register now to download your created sounds!

Nemisindo Adaptive Footsteps for Unity Documentation

Nemisindo's Adaptive Footsteps plugin features a dynamic sound model capable of generating footsteps in real time, completely procedurally. This model is implemented as a Native Audio Plugin and can generate sound effects in real time. The model comes with 4 different shoe types, 7 surface types, and offers controls for the pace, step firmness, steadiness, etc. Nemisindo Footsteps also offers various functions to change these parameters at runtime. This means they can be linked to any in-game events, which can lead to very organic and dynamic sound scenes. We also provide 12 presets, such as "high heels on pavement", "boots on dirt", "running on grass", etc.


The model is written in C++ wrapped in a custom UI.

The plugin is loaded as audio effects in the mixer channel and the audio signal is passed to the audio source object mapped to that mixer channel.

The plugin audio parameters can be controlled in real-time using special setter functions via the unity C# scripting API.

  • Supported Target Platforms: Windows (x64 & x32), MacOS, Android

  • Tested with Unity versions: 2018.4.36f1 or later.

  • Included models: Engine

  • Import from Unity Asset Store: After purchasing the plugin from the asset store, click on add to my assets. To use the plugin in a project, click on open in unity from the popup on the asset store webpage. Once you've located Nemisindo Footsteps in your package manager, you can add it to your project by downloading and importing it from the package manager.

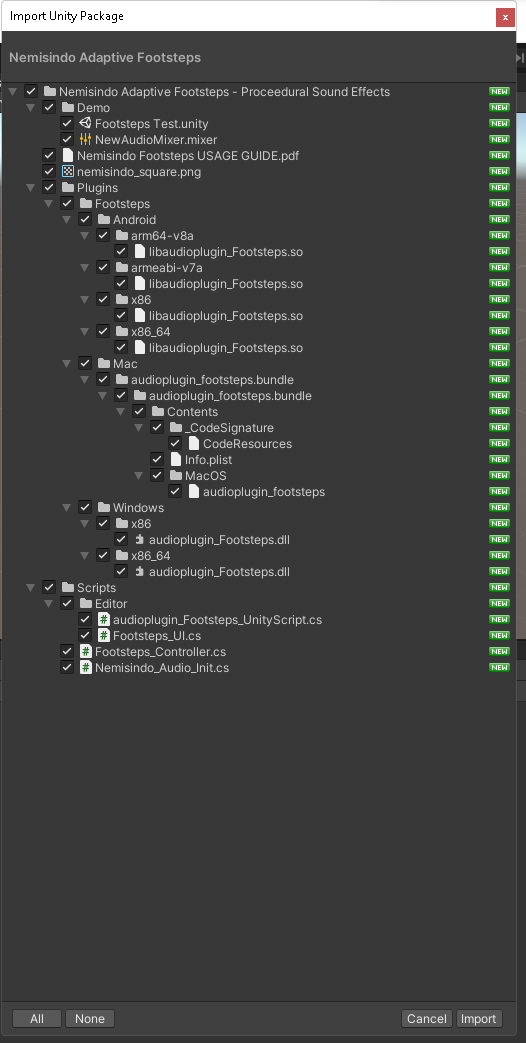
    Import as custom package: If importing the package as a file from your machine, click on [Assets] -> [Import Package] -> [Custom Package...] and select the file.

    Make sure everything is selected, then click "Import". Once you've imported it into unity you can also view the plugin listed in the package manager. Refer to this article for more information on how to add new packages to your package manager.

    The resultant asset folder "Nemisindo Adaptive Footsteps - Procedural Sound Effects" contains three folders: "Plugins", "Demo", and "Scripts".

  • The "Plugins" folder contains a set of .dll files for Windows, a set of .bundle files for MacOS, a set of .so files for Android.

  • The "Scripts" folder contains C# scripts for UI, Serialisation and Control.

  • The "Demo" folder contains different scenes for testing each plugin.


  • Important file list:

  • .bundle (macOS) or .dll (Windows) or .so (Android) file: This is the actual Native Audio Plugin. Note: Unity requires the audio plugin to be named starting with audioplugin_ so do not rename the plugin file name.

  • /scripts/Editor/Footsteps_UI.cs: This is the C# script for the UI. Do not change existing code or it might break the UI. However towards the end of this file there is a presets section and you can save your own presets in here. You can find instructions for that towards the end of this document.

  • /scripts/Editor/audioplugin_Footsteps_UnityScript.cs: This is the serialisation script. The main purpose of this script is to enable data serialisation between the UI and the DSP core of the plugin via audio parameters. Kindly do not make any changes to the script.

  • /Scripts/Footsteps_Controller.cs: This is the controller script. This is created for conveniently interacting with the plugin and changing its parameters using the unity scripting interface. Each plugin has a set of functions that can be used to control the sliders, triggers, and dropdown boxes in the plugin. Note: The controller scripts can be added as a component to any object. It can be found under the nemisindo submenu under when you click on add component or from the menu bar at [Component] -> [Nemisindo].

  • /scripts/Nemisindo_Audio_Init.cs: This is the audio initialisation script. Add this script to at least one audio source attached to every audio mixer to enable sound from the Native Audio Plugin. This can be accessed from the nemisindo submenu under the component menu [Component] -> [Nemisindo].

  • To add a plugin to a mixer channel:

    1. Make sure the "Nemisindo Adaptive Footsteps - Procedural Sound Effects" folder is in your "Assets" folder.


    2. Inside the [Audio Mixer] tab, create a new mixer if one does not already exist. Refer here for more information about the Unity Audio Mixer.


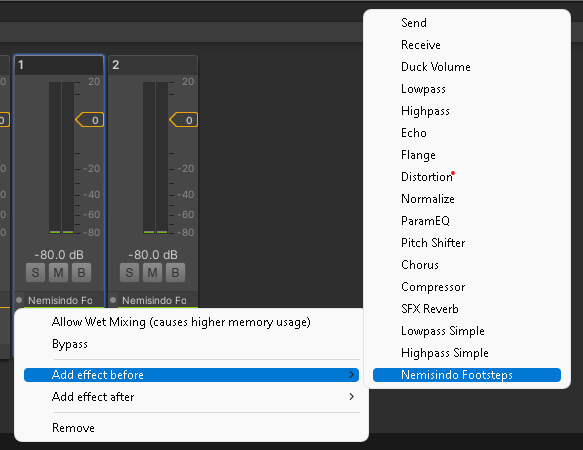
    3. If the Nemisindo Footsteps effect is not already in the mixer, right click near on [Attenuation] in the mixer channel strip and click on [Add Effect Before] then select [Nemisindo Footsteps] to add it to the current mixer. Alternatively you can click on the [Add...] button at the bottom of the channel strip and select the required plugin.

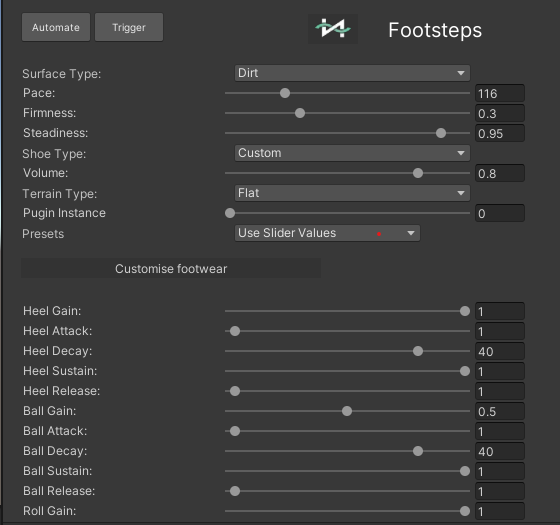
    The Footsteps plugin contains 14 various to shape the plugin's sound. Once a model is added to the mixer channel, click on [Nemisindo Footsteps] on the mixer strip, to view the plugin UI in the [Inspector] window. Everyplugin has a set of audio parameters, a plugin instance slider, and a preset selection drop down menu.

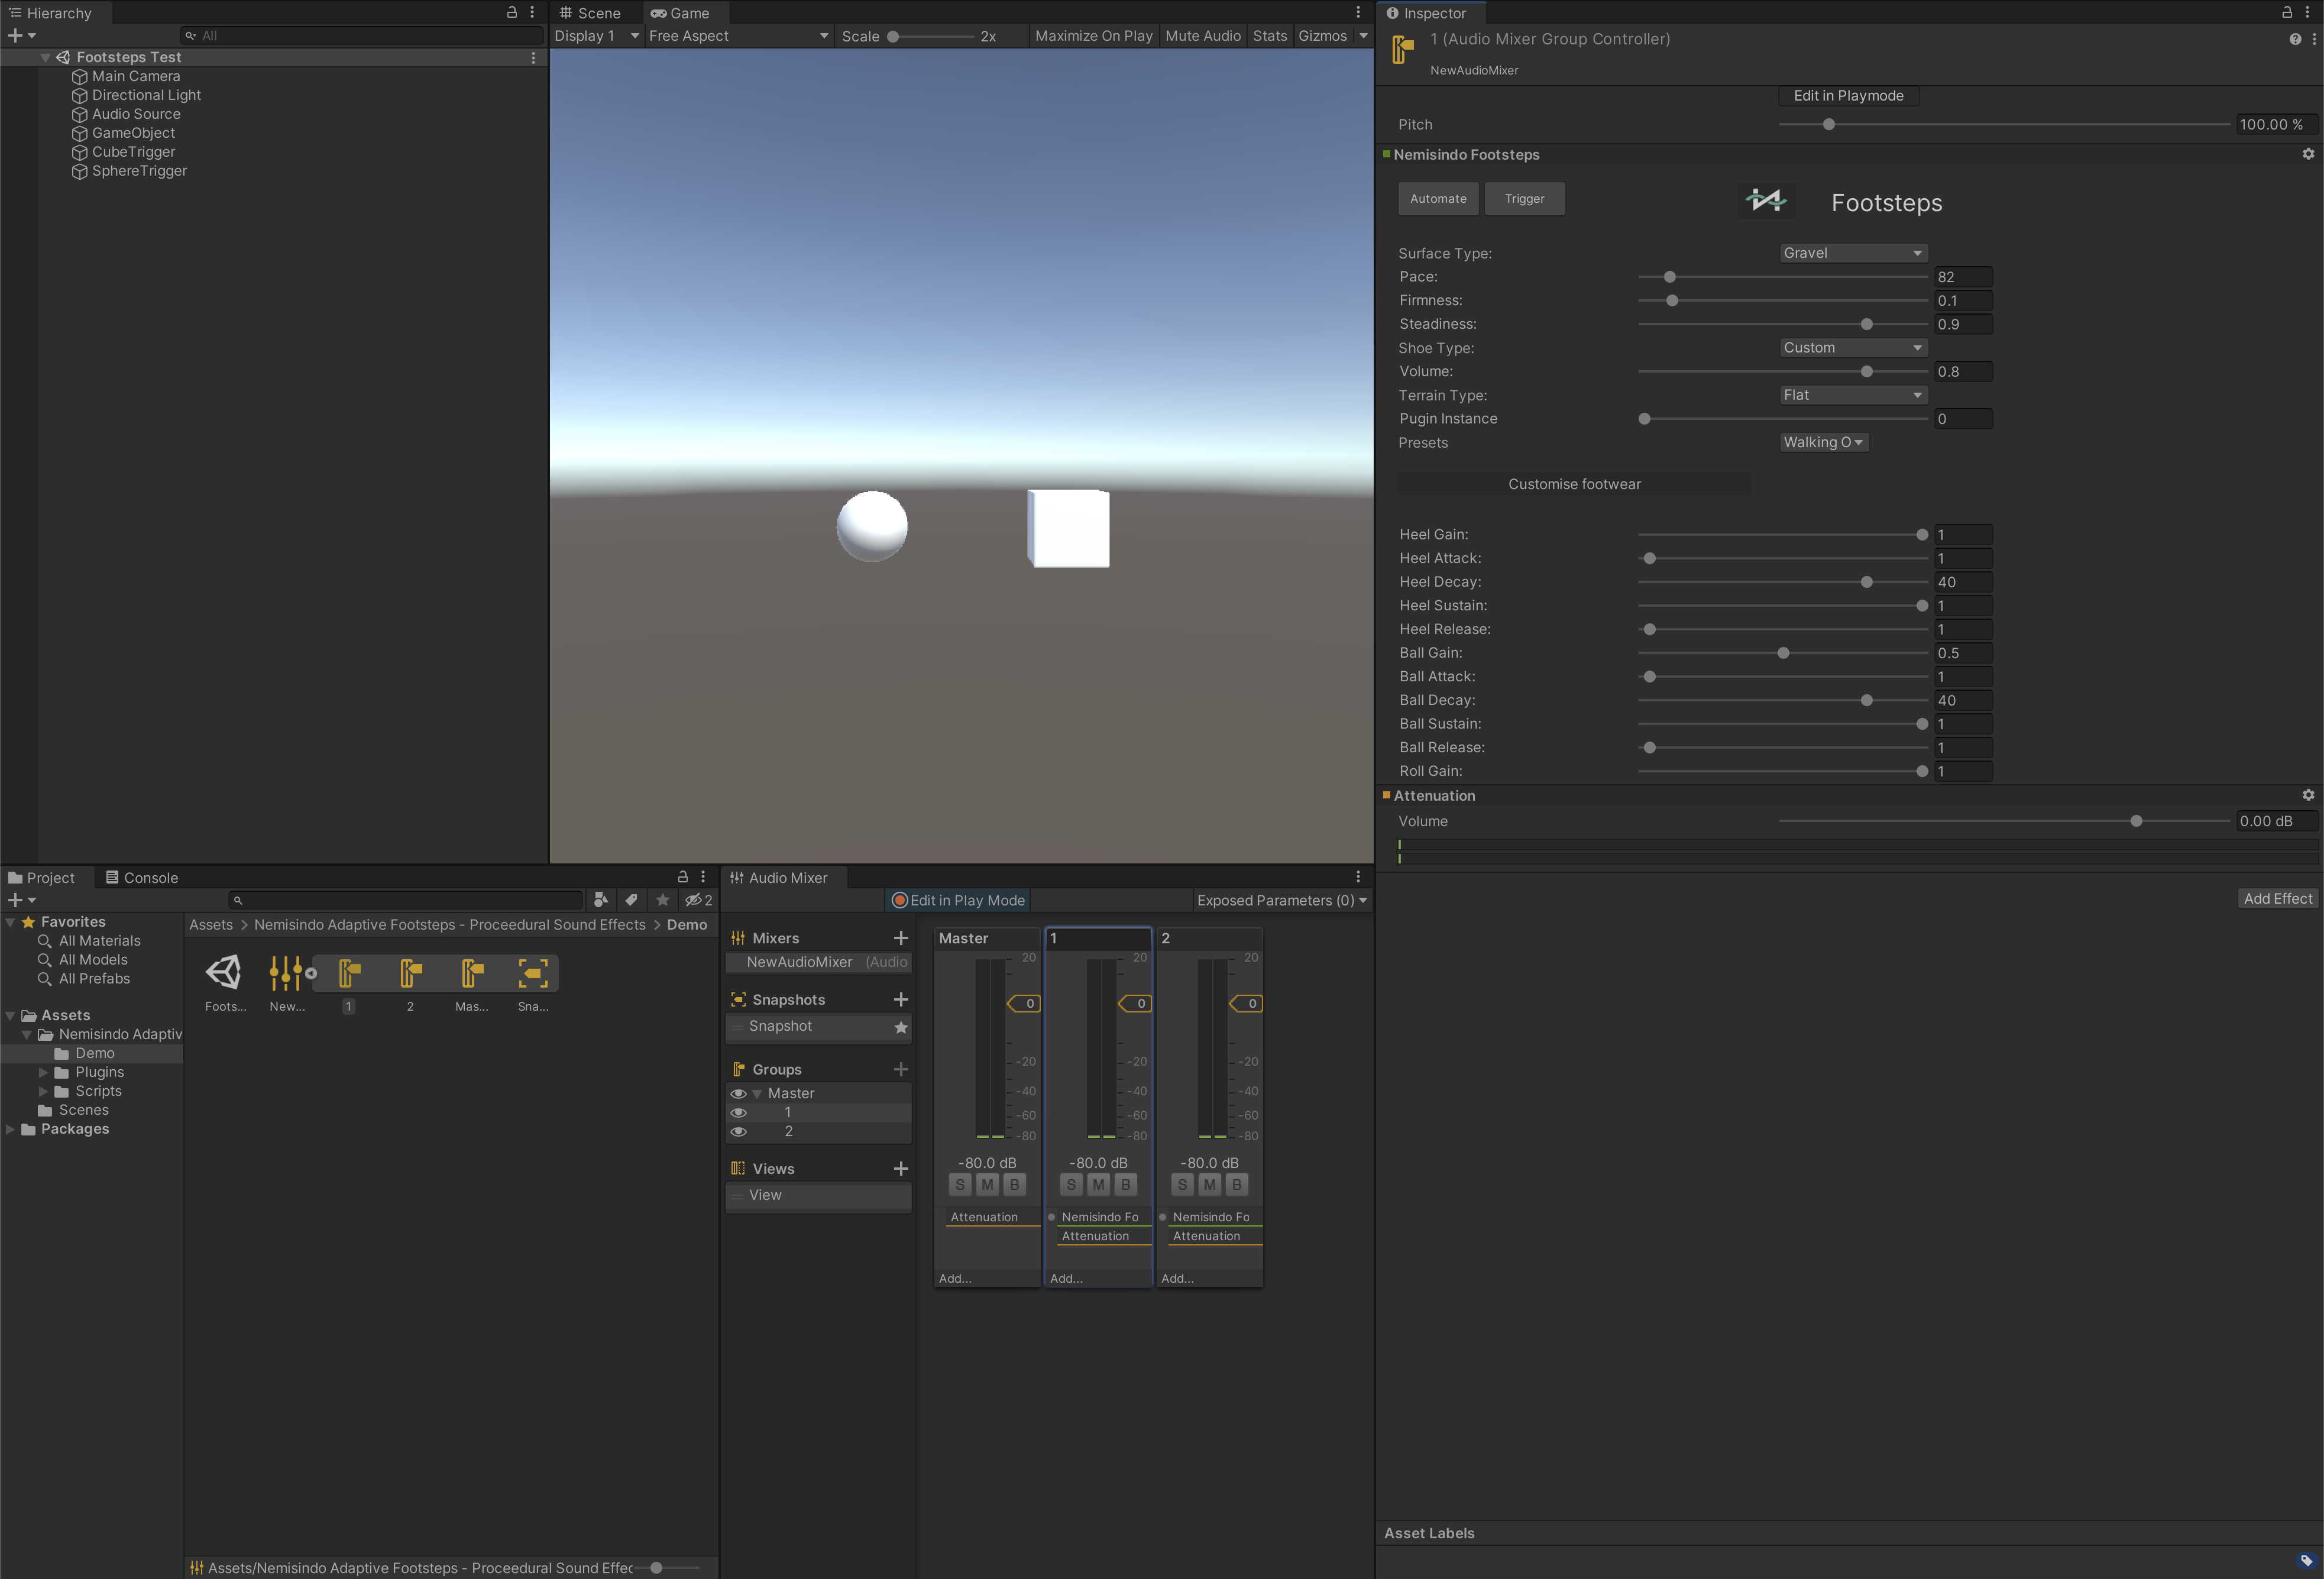
    The parameters of the Footsteps model as viewed in the [Inspector] window:

    To hear sounds from the model:

    1. Create an audio source and route its output to the mixer channel in which the plugin is loaded into.

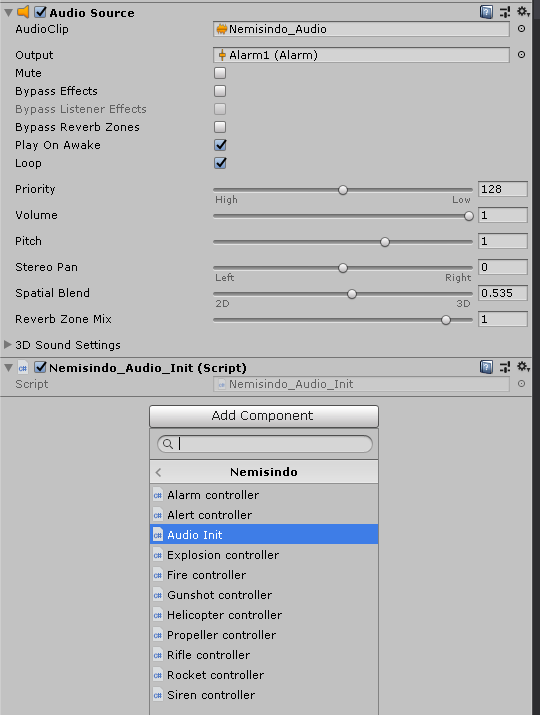
    2. Add a new Component to that audio source and from the list of Components select Nemisindo and load the Audio Init script from the list. This enables audio from the Native Audio Plugin to pass through the respective audio source. Note: Every mixer channel with a Native Audio Plugin requires a new audio source and an Audio Init Component for seamless integration.

    3. Now run the game by clicking on the play button. Inspect [Nemsindo Footsteps] effect in the mixer, allow [Edit in Playmode]. Now start the plugin by clicking on "Automate" in the UI. You can then dynamically adjust plugin parameters and select presets during runtime.

    Attaching the model to in-game events through Unity's scripting API:

    1. Open /Demos/Footsteps Test

    2. In this demo, there are 2 instances of the Footsteps model. The first instance is manually triggered once per click interaction with the sphere object. This is done through calling the Footsteps model's setTrigger() function when the cube is clicked. The second instance of the Footsteps model will be triggered to "walk" following a click interaction with the cube object. This is done through calling the Footsteps model's setStart() and setStop() functions when the cube is clicked. This scripting is is shown in Scripts/Footsteps_Controller.cs.

    3. In the given demo scene, the triggering of the first instance of Footsteps plugin is linked with the GetMouseButtonDown() function, meaning that this instance of the model will start when the "SphereTrigger" is clicked.

    4. Similarly, the starting of the automation of another instance of the Footsteps plugin is linked with the GetMouseButtonDown() function, meaning that this instance of the model will start when the "CubeTrigger" is clicked, and stop when it is clicked again.

    5. More information on the functions exposed in the Footsteps model's API can be found in the API section of this documentation.

    As mentioned in the previous section, the Footsteps model provides an API to change the sound parameters at runtime through Unity's scripting API. This makes linking parameters to in-game events very easy.

    In your C# script, make sure you have

    using System.Runtime.InteropServices

    at the top of the file to enable communication with the plugin. To access the setPace() model function, use the following code snippet inside the Footsteps_Controller class in Scripts/Footsteps_Controller.cs.
    
                            #if UNITY_IOS
    [DllImport("__Internal")]
    #else
    [DllImport("audioplugin_Footsteps")] static extern float setPace(float channel, float value);
    #endif

    where setPace() alters the pace of the steps.

    A list of functions exposed by the Footsteps model for use in scripting can be found in Scripts/Footsteps_Controller.cs. The are described in more detail in the API section of this documentation.

    If you want to import multiple functions, add another similar block right after the previous import with the required function name. You can import multiple plugins and call their respective functions if needed. The following snippet demonstrates importing setPace() and setFirmness()
    
                            #if UNITY_IOS
    [DllImport("__Internal")]
    #else
    [DllImport("audioplugin_Footsteps")] static extern float setPace(float channel, float value);
    #endif
    #if UNITY_IOS
    [DllImport("__Internal")]
    #else
    [DllImport("audioplugin_Footsteps")] static extern float setFirmness(float channel, float value);
    #endif

    In the following example, the first instance of the Footsteps model is triggered through the setTrigger() function when the "SphereTrigger" object is clicked, and the second instance of the Footsteps model is either started or stopped through the setStart() and setStop() functions when the "CubeTrigger" object is clicked. Note that at the top of the Footsteps_Controller class, the Footsteps functions are first imported.

    
                            using UnityEditor;
                            using UnityEngine;
                            using System.Runtime.InteropServices;
                            using UnityEngine.SceneManagement;
            
                            public class Footsteps_Controller : MonoBehaviour
                            {
                                #if UNITY_IOS
                                    [DllImport("__Internal")]
                                #else
                                    [DllImport("audioplugin_Footsteps")] static extern float setTrigger(float channel);
                                #endif
            
                                #if UNITY_IOS
                                    [DllImport("__Internal")]
                                #else
                                    [DllImport("audioplugin_Footsteps")] static extern float setStart(float channel);
                                #endif
            
                                #if UNITY_IOS
                                    [DllImport("__Internal")]
                                #else
                                    [DllImport("audioplugin_Footsteps")] static extern float setStop(float channel);
                                #endif
            
                                public float flag1 = 0;
                                public float flag2 = 0;
            
                                // Start is called before the first frame update
                                void Start()
                                {
                                }
                                
                                void Update()
                                {
                                    if (Input.GetMouseButtonDown(0))
                                    {
                                        Ray ray = Camera.main.ScreenPointToRay(Input.mousePosition);
                                        RaycastHit hit;
                                        if (Physics.Raycast(ray, out hit))
                                        {
                                            if (hit.transform.name == "SphereTrigger")
                                            {
                                                setTrigger(0);
                                            }
                                            if (hit.transform.name == "CubeTrigger")
                                            {
                                                if (flag2 == 0 || flag2 % 2 == 0)
                                                {
                                                    setStart(1);
                                                }
                                                if (flag2 == 1 || flag2 % 2 == 1)
                                                {
                                                    setStop(1);
                                                }
                                                flag2++;
                                            }
                                        }
                                    }
                                }
                            }


    Model parameters can be get and set through either their index or directly through their name.


    Access parameter through its index:

    The Footsteps model has 21 parameters, and each parameter can be accessed through its respective index (0 - 20).

    Every Nemisindo model is provided with setFloatValue(int channel, int index, float value) and getFloatValue(int channel, int index) functions.
    setFloatValue(int channel, int index, float value);
    getFloatValue(float channel, int index);
    Channel: the current plugin instance, which can be explicitly mentioned by the user. There can be 32 different instances of any plugin running at once in your project.

    Index: the index of the plugin parameter, the index numbers are outlined in /Scripts/Editor/audioplugin_Footsteps_UnityScript.cs.

    Value: the value the designated parameter will be set to.


    Example 1:

    To set the "Pace" parameter (1st index) of the 0th channel (the first instance of the Footsteps model that you add) to 0.8:
    setFloatValue(0, 1, 0.8);

    Example 2:

    To get the "Pace" of the same channel (i.e. instance):
    getFloatValue(0, 1);


    Access parameter through its name:

    Instead of using the parameter index to set the parameter values, you can import relevantly named functions to access the parameter values instead. The Footsteps model has 21 such functions as it has 21 parameters:


    Note: All of the functions mentioned in this section are imported in the way described in the previous "Scripting" section.

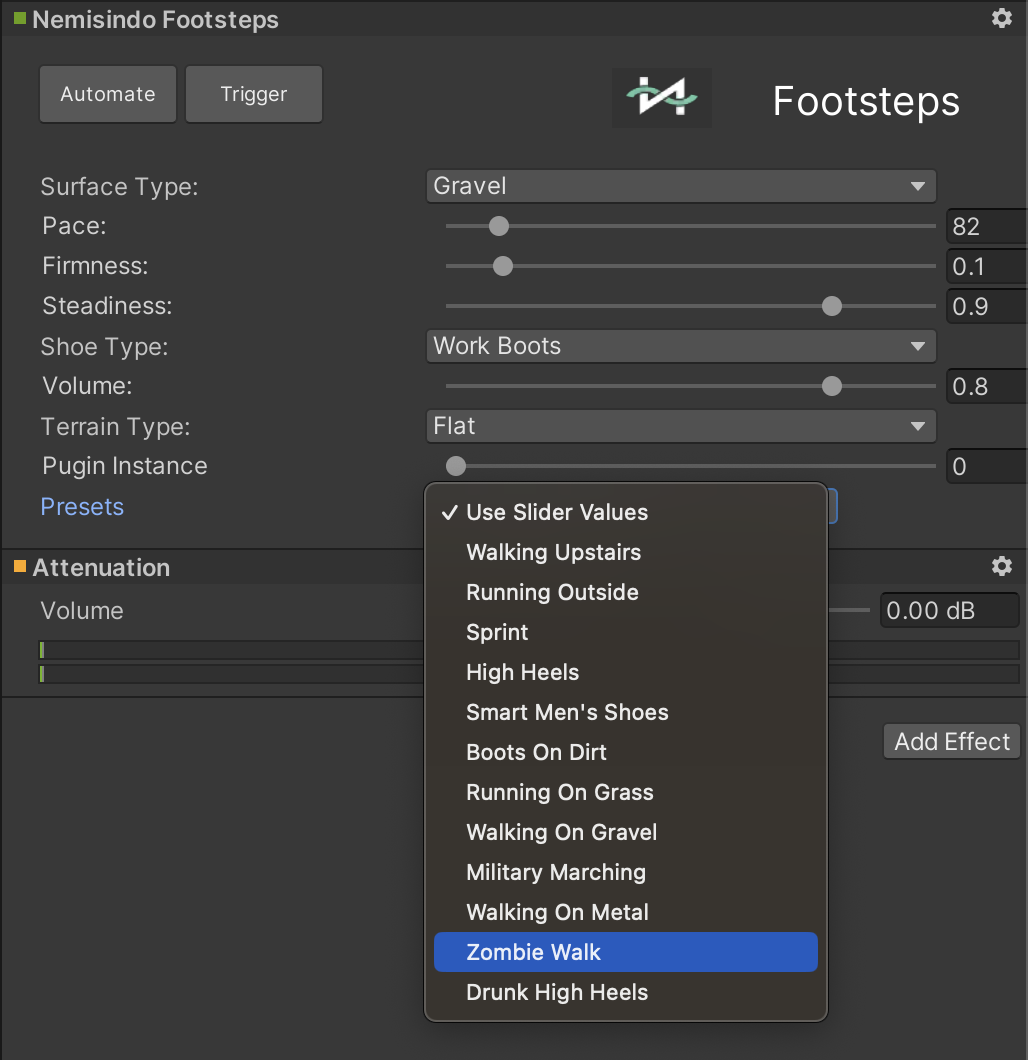
    The Footsteps model contains 12 presets accessible form the preset drop down box in the plugin UI.

    You can also add your own preset to the UI in the following way:

    In the plugin’s UI script /scripts/Editor/Footsteps_UI.cs, at the bottom you can see how the default presets have been added. Add the name of your new preset inside the curly brackets of the following snippet:

    
                        Footsteps_parameter_options = new string[] { }


    Then inside the following snippet add your own preset values:
    
                        if (Footsteps_prevPreset != Footstep_Presets) { }
                        

    Best practice is to copy code from another preset and paste it towards the end of the list of presets and change the required parameter values. The following example shows adding a preset with the name "The New Preset".

    
                            if(Explosion_prevPreset != Explosion_Presets).
                            GUILayout.BeginHorizontal();
                            //Here you can add the name of your new preset
                            string[] Footsteps_parameter_options = new string[]
                            {
                            "Use Slider Values","Walking Upstairs","The New Preset"
                            };
                            Footsteps_Presets = EditorGUILayout.Popup("Presets", Footsteps_Presets, Footsteps_parameter_options, GUILayout.Width(400));
                            if (Footsteps_prevPreset != Footsteps_Presets)
                            {
                              // "Use Slider Values"
                              if (Footsteps_Presets == 1)
                              {
                                  Footsteps_Firmness = 0.3f;
                                  Footsteps_ShoeType = 0;
                                  Footsteps_SurfaceType = 4;
                                  Footsteps_TerrainType = 0;
                                  Footsteps_Pace = 130.0f;
                                  Footsteps_Steadiness = 0.95f;
                                  Footsteps_Volume = 0.8f;
                              }
                              // "Walking Upstairs"
                              if (Footsteps_Presets == 2)
                                {
                                Footsteps_Firmness = 0.3f;
                                Footsteps_ShoeType = 0;
                                Footsteps_SurfaceType = 3;
                                Footsteps_TerrainType = 0;
                                Footsteps_Pace = 150.0f;
                                Footsteps_Steadiness = 0.95f;
                                Footsteps_Volume = 0.8f;
                              }
                              // "The New Preset"
                              if (Footsteps_Presets == 2)
                              {
                                  Footsteps_Firmness = 0.1f;
                                  Footsteps_ShoeType = 3;
                                  Footsteps_SurfaceType = 2;
                                  Footsteps_TerrainType = 0;
                                  Footsteps_Pace = 82.0f;
                                  Footsteps_Steadiness = 0.9f;
                                  Footsteps_Volume = 0.8f;
                              }
                          }


    The Footsteps model can be processed and spatialised just like any other sound, using Unity's built in effects.

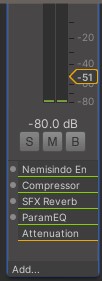
    You can apply post processing effects to the Footsteps model by loading effects after the [Nemisindo Footsteps] model in the mixer channel.

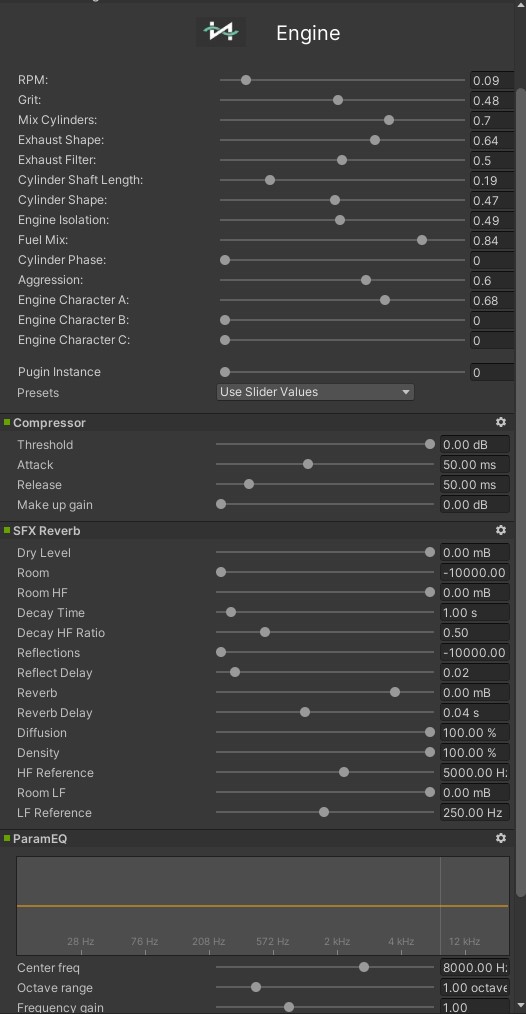
    The smaller upper image above shows multiple effects loaded in after the [Nemisindo Engine] model. The larger image shows all the effects' parameters viewed in the [Inspector] window.

    Can't find what you're looking for? Let us know.