
Wwise
Action Pack in Wwise
Nemisindo Action Pack generates sound inside Wwise. Shape a factory preset, then connect it to gameplay with Events and Game Parameters.
Available for Wwise 2024 and 2025, Action Pack contains nine source models: Alarm, Alert, Explosion, Fire, Gun, Helicopter, Jet, Rifle, and Rocket.
Install Action Pack
- Download and extract the Wwise edition from your Action Pack purchase.
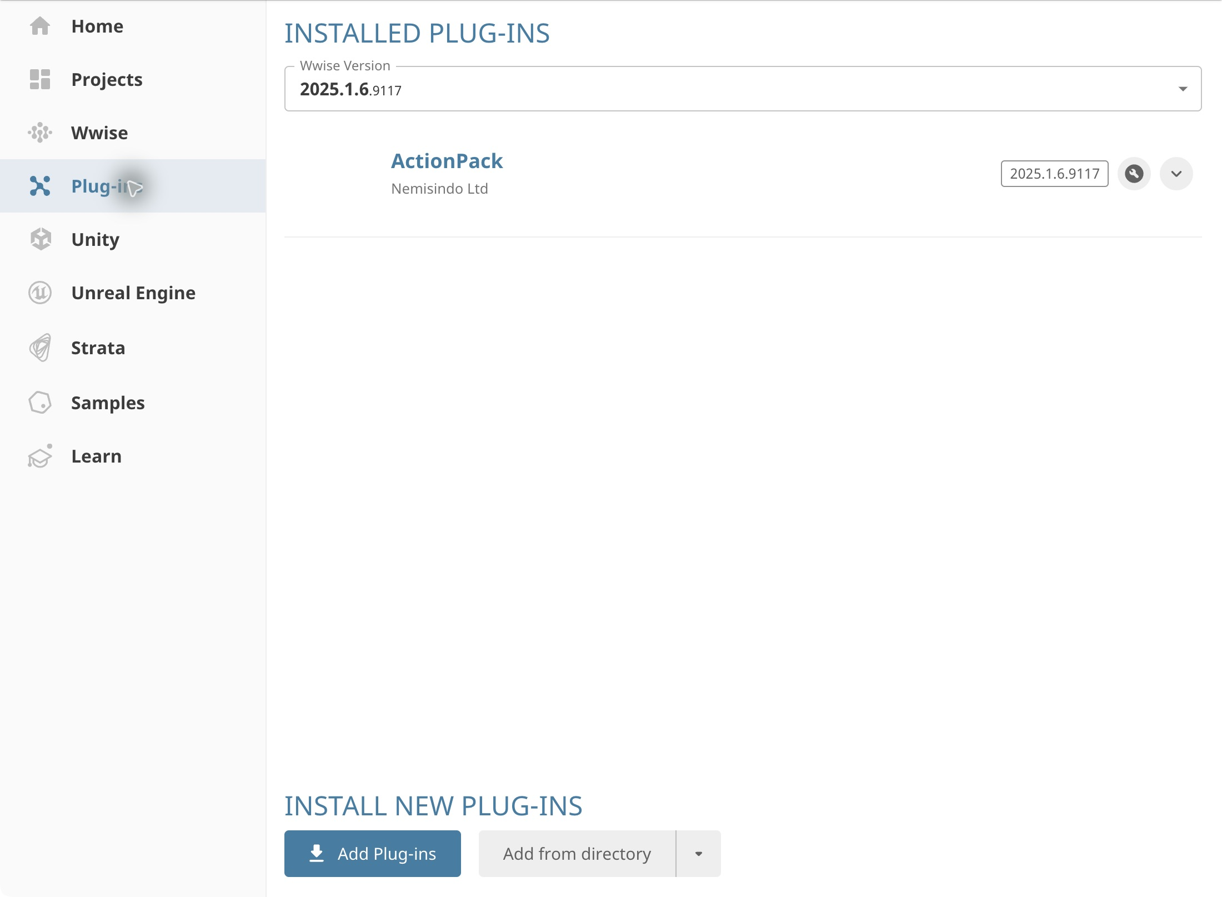
- Close Wwise. Open Audiokinetic Launcher → Plug-ins and select the Wwise version used by your project.
- Choose Add from directory and select the extracted bundle directory containing
bundle.json. Keep the accompanying package archives alongside that file. Follow the Launcher’s installation steps for ActionPack. - Confirm that ActionPack — Nemisindo Ltd appears under Installed Plug-ins for the intended Wwise version, then reopen your project in that version.
- In Wwise, use Project → Import Factory Assets and select ActionPack to add the supplied presets.
Use the package for your Wwise version. For in-game playback, also add the ActionPack runtime libraries to your game’s Wwise integration.
Create your first sound
- In the Actor-Mixer Hierarchy, create a Sound SFX object in your own Work Unit. Give it a descriptive name, such as
Interactive Fire. - Open the object and find its Contents area. Choose Add Source → Fire from the source plug-in list. These are source plug-ins: add them to a Sound SFX object, rather than to an Effects slot.
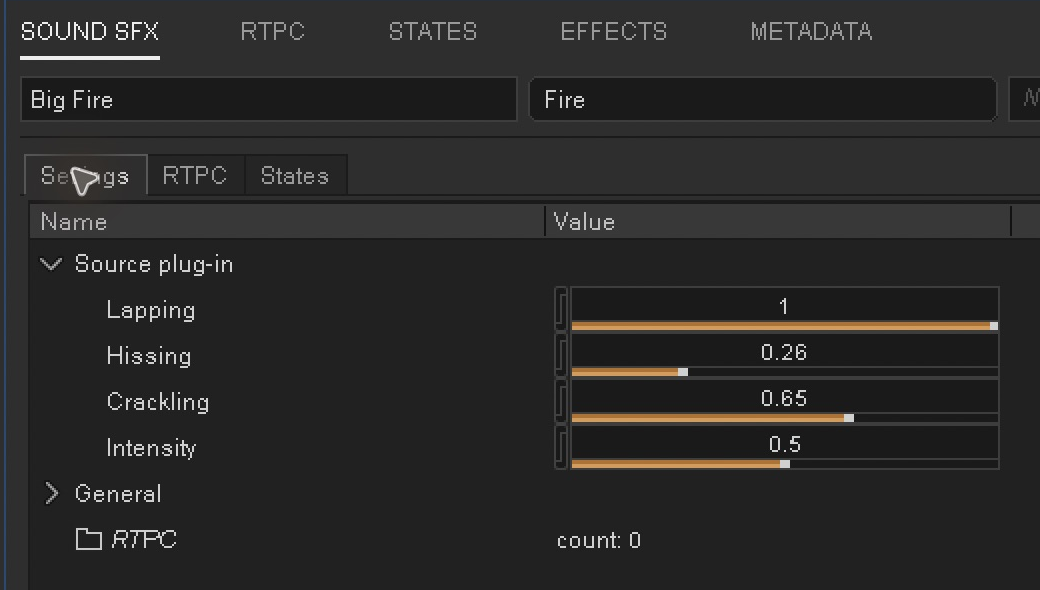
- Select the Fire source in Contents. Its Settings tab exposes Lapping, Hissing, Crackling, and Intensity.
- For sustained Fire playback, enable the sound’s Loop option and Loop Infinite. Use Wwise’s Transport Control to play the selected sound, then stop it when finished.
- Adjust one source control at a time. Keep the sound and output bus at a comfortable monitoring level and watch the output meter.
The Sound SFX object holds routing, positioning, and playback settings; its source holds the Nemisindo model controls. Select the source in Contents whenever you need to edit those controls.
Work with factory presets
The factory assets are Wwise sound objects organised into model folders. Expand Factory ActionPack in the Actor-Mixer Hierarchy and select a sound, such as Big Fire, Fast Flying Helicopter, Big Blast, or Red Alert. Play it in the Transport Control and inspect its source settings.
Duplicate a useful sound into your own Work Unit before customising it. Rename the copy for its intended role, adjust the source, routing, and playback settings, then save the project. This preserves the factory sound as a reference. A preset stores settings for the generator; it is not a prerecorded sample.
For a one-shot sound such as an explosion or alert, leave looping disabled and play it again to compare edits. For sustained models such as Fire, Helicopter, Jet, and Alarm, use continuous playback while adjusting controls. Add a Stop Event when that sustained sound will be controlled by the game.
Make Fire respond to gameplay
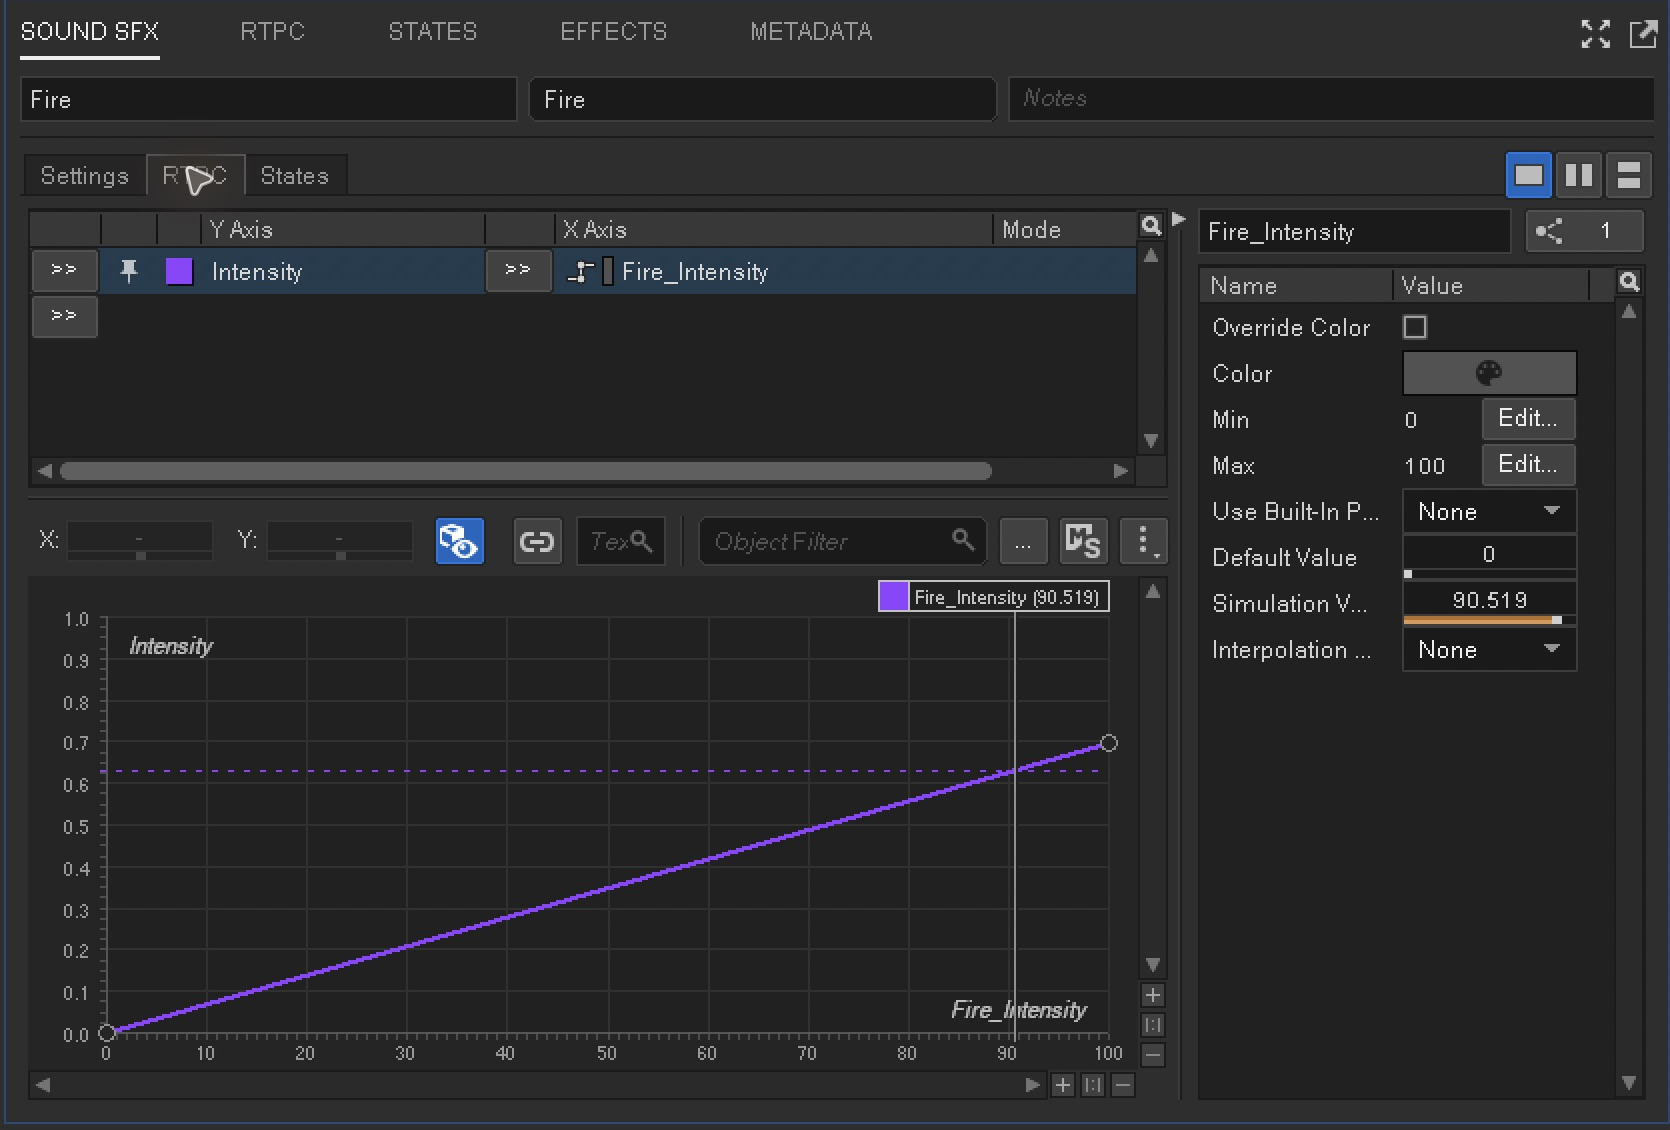
An RTPC (Real-Time Parameter Control) maps a Game Parameter to a sound property. For example, a gameplay value called Fire_Intensity can drive the Fire source’s Intensity control. The Game Parameter’s range and the source property’s range are independent; the curve translates between them.
- Create a Game Parameter named
Fire_Intensityunder Game Syncs → Game Parameters, with a minimum of 0, maximum of 100, and default of 0. - Open your Fire source and select its own RTPC tab. Use the property selector on a new row to choose Intensity for the Y Axis.
- In the same row, choose
Fire_Intensityfor the X Axis. - Edit the curve endpoints to X = 0, Y = 0 and X = 100, Y = 0.7. This caps the source intensity at 0.7.
- Play the sound. Move the Game Parameter’s Simulation Value through 0–100 and listen to the change. At 50, this linear curve produces an Intensity of 0.35.
- Save the project. Have the game start the sound with a Play Event and update
Fire_Intensityas the fire grows or diminishes.
Send a Play Event to start Fire and a Stop Event when it is no longer needed. Intensity 0 silences the sound without stopping its voice. Simulation Value previews the curve in Wwise; your game supplies the runtime values.
Build a Helicopter throttle
Start with Fast Flying Helicopter or a copy of another Helicopter preset. Keep Engine Mix above zero so that changes to the engine are audible.
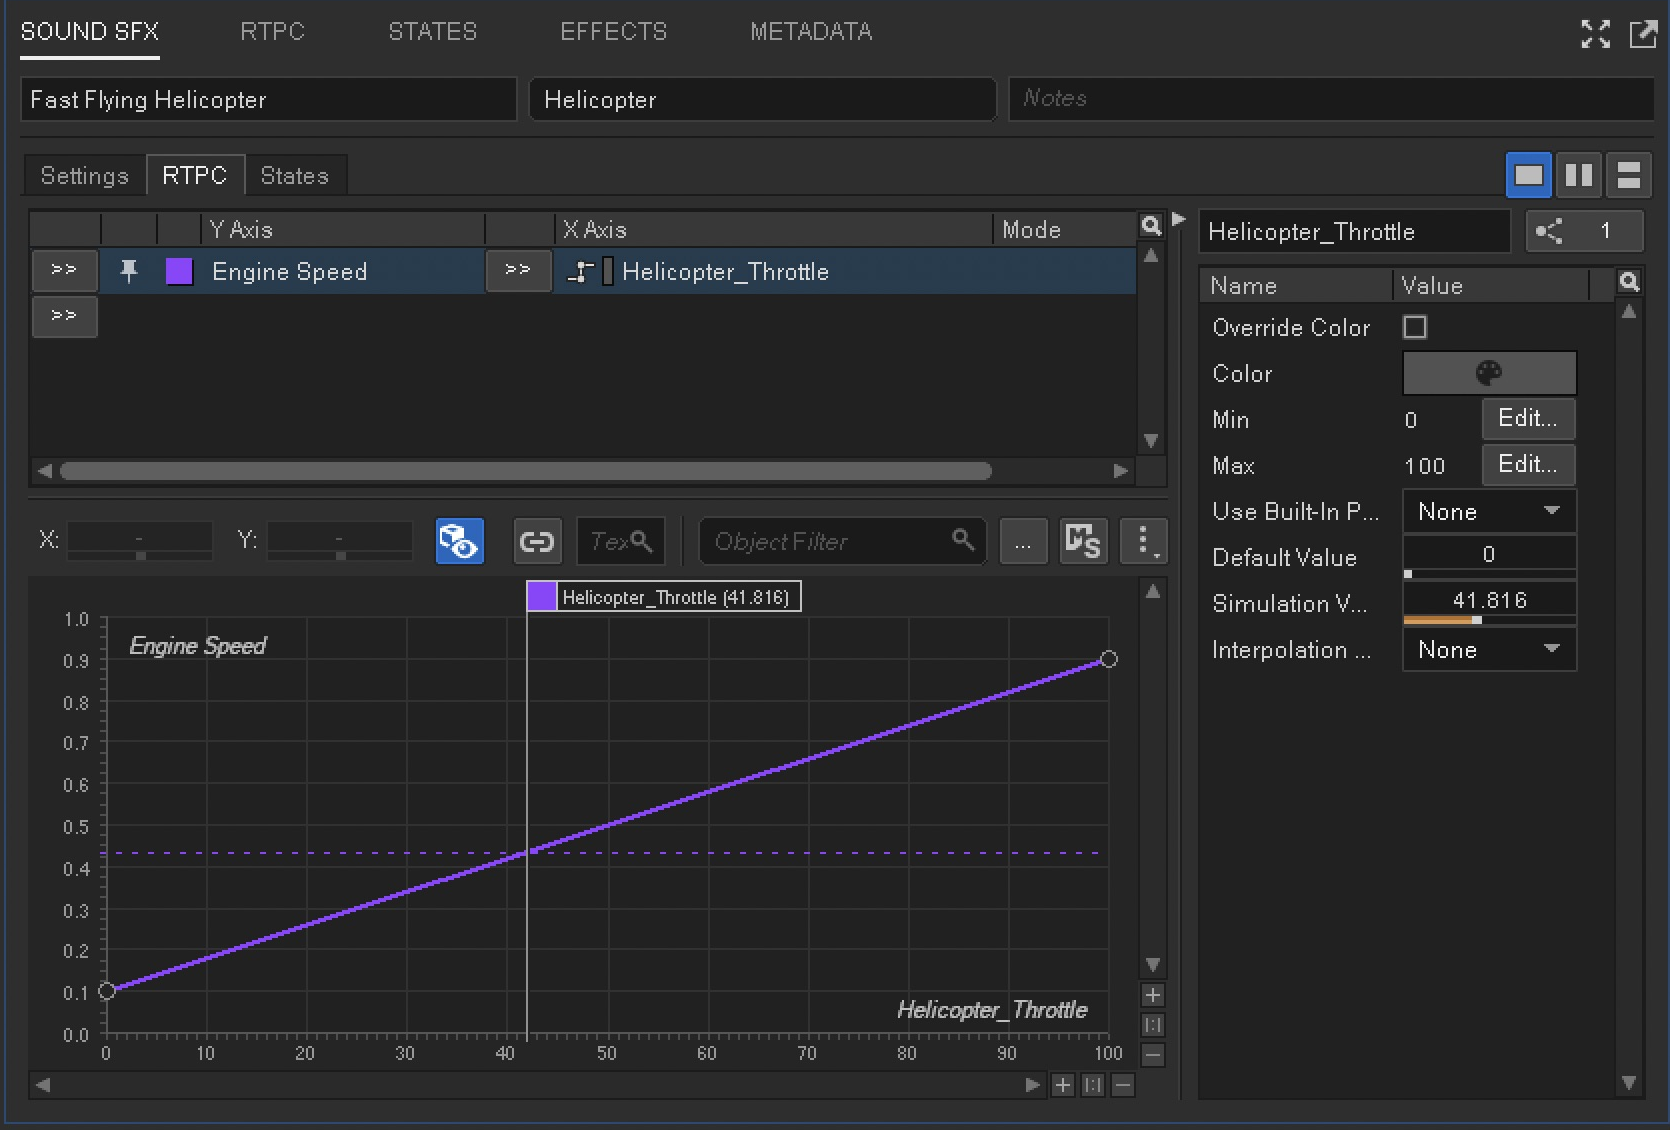
Create a Game Parameter named Helicopter_Throttle, ranging from 0 to 100. In the Helicopter source’s RTPC tab, map it to Engine Speed. A useful first curve is 0 → 0.1 and 100 → 0.9. Play the looping sound and sweep the Simulation Value to hear the response.
Once this works, try mapping the same parameter to Rotor Period with a separate curve. A smaller period means faster rotor repetition, so that curve will usually slope down as throttle rises. Tune Engine Mix, Tail Mix, and Rotor Mix independently to balance the layers. Use Wwise positioning and attenuation for movement and distance in the scene.
Sound model reference
Ranges below are the values shown in the source controls. Replay one-shot sounds after changing their settings.
Alarm
A sustained, frequency-modulated alarm. Carrier Frequency (50–5000) sets its base pitch; Carrier Shape selects Sine, Sawtooth, Triangle, or Square. Rate (0.1–10) sets the modulation speed, Depth (0–2500) its amount, and Shape the modulator waveform. Start with Rate and Depth to move between a steady warning and an urgent pulse.
Alert
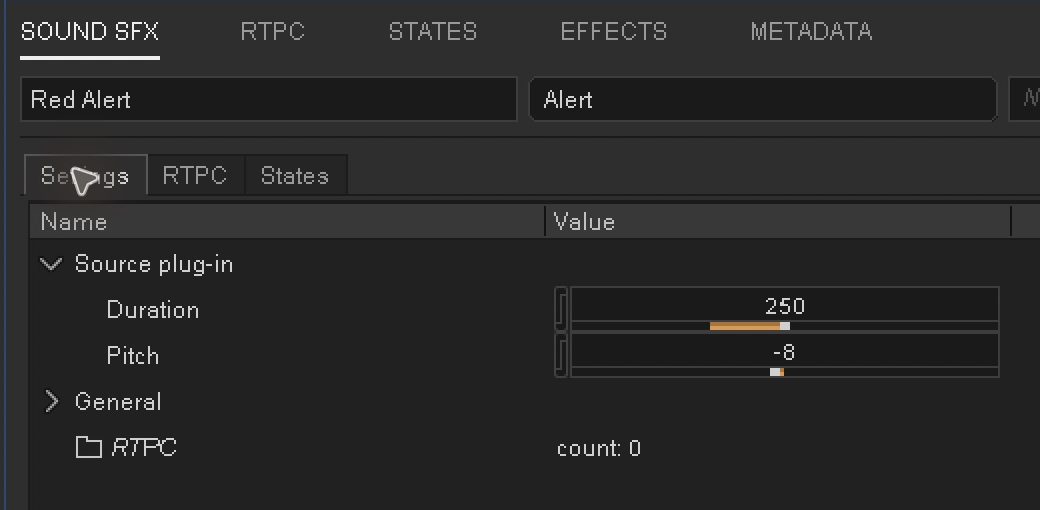
A short, blaring alert. Duration (−500–1000) shapes its length and Pitch (−340–360) sets its base pitch. Both use model-specific scales. Start with Red Alert for a warning or Low Pitched Alert for a lower tone.
Explosion
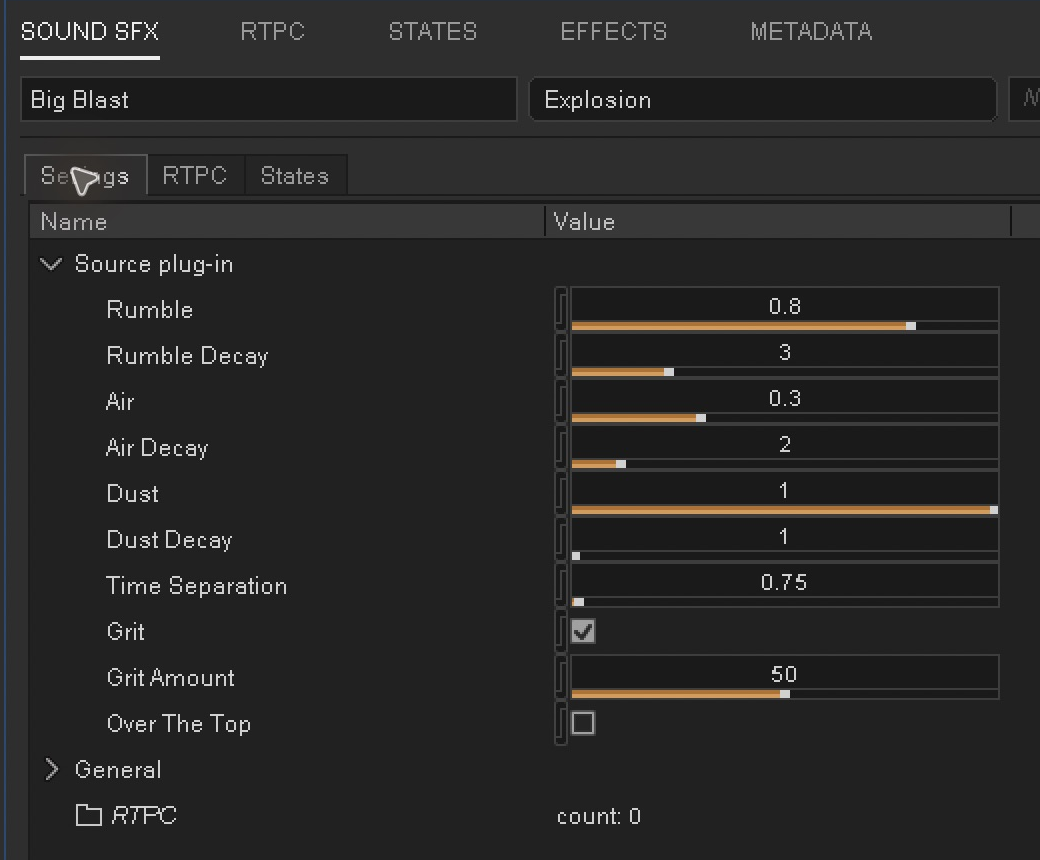
Build an impact from Rumble, Air, and Dust layers (each 0–1). Each has its own Decay control (1–10). Time Separation (0–100) changes the separation between components. Grit enables distortion, Grit Amount (0–100) sets its strength, and Over The Top adds extra punch. Compare Big Blast and Firework, then change one layer or decay at a time.
Fire
Lapping, Hissing, and Crackling (each 0–1) balance the flame layers. Intensity (0–1) controls the overall fire level. Start with a factory preset and vary the layer balance before attaching a gameplay curve. The Fire RTPC walkthrough above maps a 0–100 gameplay value into this 0–1 source range.
Gun
A one-shot gun sound with Shell Decay (0.01–1) controlling the duration of its shell-noise component and Shell Frequency (0.05–1) controlling that component’s pitch. Compare factory sounds such as Pistol and Machine Gun, then replay after changing either control. The Gun source and the separate Rifle source are different models; a preset named Rifle inside the Gun folder still uses Gun.
Helicopter
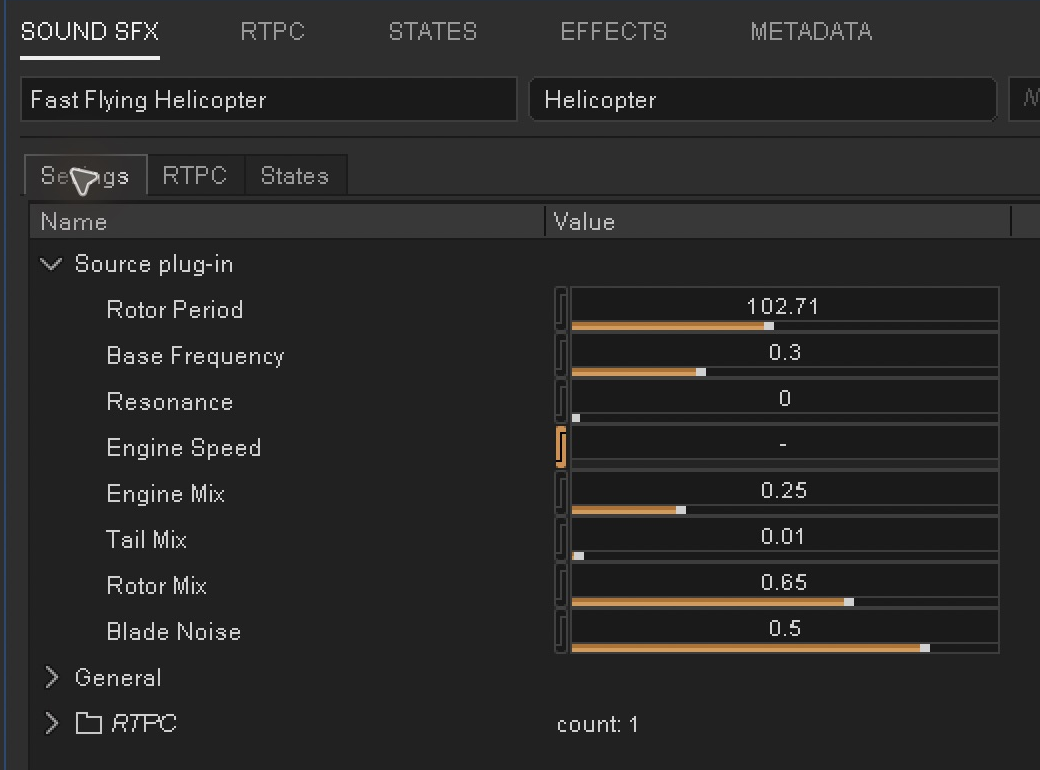
Rotor Period (10–210) sets the main rotor repetition period. Base Frequency and Resonance (0–1) shape its tone. Engine Speed (0–1) controls the engine, while Engine Mix, Tail Mix, and Rotor Mix (0–1) balance the layers. Blade Noise (0–0.6) adds noise to the rotor sound.
Jet
A sustained turbine and burn sound. Speed (0–1) changes turbine speed; Turbine and Burn (0–1) balance the whine and roar. Map throttle to Speed first, then add a separate Burn curve if the sound should become more forceful under load.
Rifle
A separate one-shot weapon model. Rifle Type selects AK-47, Beretta, or Winchester. Highs, Mids, and Lows (−12–12) shape the tonal balance; Decay (0–1) shapes the tail. Choose the type first, then adjust the balance and replay to compare.
Rocket
A rocket-launcher sound. Duration (1–10) shapes the flight, Chamber Resonance (16–20) changes the resonant character, and Flutter (2–40) adjusts the flutter. Set the sound up before playing it; use an Event to trigger a launch.
Use the sounds in your game
- Create a Play Event targeting the Sound SFX object. For a sustained sound, also create a Stop Event, with a fade appropriate to the scene.
- Include the required Events and objects in your SoundBank workflow and generate the banks for the target platform.
- Ensure your game’s Wwise integration includes the matching ActionPack sound-engine plug-in for that platform and build configuration. The SoundBank carries sound data and settings; it does not replace the runtime plug-in library.
- Register or use the intended Wwise game object, set its initial Game Parameter values, and post the Play Event on that object. Update the same object’s parameters as gameplay changes. Use a global parameter only when all relevant objects should share that value.
- Test in the game with Wwise connected. Check that the Event starts the expected voice, parameter updates reach it, and the Stop Event ends it. Check the Wwise Profiler and logs for missing plug-ins, banks, routing issues, and unintended extra voices.
Continuous sources can change while playing. For one-shot sounds, set up the variation before each Play Event and let the sound complete. Changing a parameter is not a retrigger command. Avoid posting a fresh Play Event every frame just to update a running engine or fire sound.
Mix the output using Wwise buses, effects, positioning, and attenuation. Profile gameplay on your target device, including the peak number of simultaneous voices.
Troubleshooting
- ActionPack is missing from Add Source: check the selected Wwise version in Launcher, confirm the plug-in is installed for that version, and restart Wwise. Use a Sound SFX source slot rather than an Effects slot.
- Factory presets are missing: import the ActionPack factory assets into this project. Installing the plug-in and importing its factory sound objects are separate steps.
- The source is present but silent: play the selected sound, then check source levels, mute/solo, bus routing, and the output device. Check whether an RTPC’s default or current value has reduced its level to zero.
- A continuous sound stops immediately: check its Loop and Loop Infinite settings. For a one-shot, leave looping off unless repetition is intentional.
- A control does not respond as expected: check whether it is assigned to an RTPC and inspect the source’s RTPC tab. Confirm the curve’s input and output ranges. Replay a one-shot after editing it.
- An RTPC works in Wwise but not in the game: verify the Game Parameter name or ID, game-object scope, initial value, and actual values sent by the game. The authoring Simulation Value does not configure game logic.
- It works in authoring but not in a packaged build: inspect the runtime logs, bank generation, and platform-specific plug-in deployment. Match the Wwise SDK version, architecture, and build configuration used by the integration.
- Playback becomes too loud or voices accumulate: inspect bus levels and voice counts. Confirm that sustained sounds are started once and stopped when no longer needed; parameter changes should update the existing voice.
Further help
See Audiokinetic’s Game Parameter and RTPC documentation for more on mapping properties to gameplay values.
For Nemisindo support, use the support channel provided with your purchase. Include your ActionPack package version, Wwise version, operating system, target platform, the source model involved, and a short description of the steps that reproduce the issue.